
Eğitimler
Graph
Bu örnek, Arduino veya Genuino'dan kişisel bir bilgisayara bir bayt veri göndermeyi ve sonucu grafik olarak göstermenizi sağlar. Buna seri iletişim denir, çünkü bağlantı aslında bir USB kablosu, bir seri-USB ve bir USB-seri dönüştürücü kullanmasına rağmen, hem anakart hem de bilgisayara seri bağlantı noktası olarak görünür.
Gönderilen verileri görüntülemek için Arduino Yazılımının (IDE) seri monitörünü kullanabilirsiniz veya İşleme (aşağıdaki koda bakın), Flash, PD, Max / MSP vb.
Gerekli Donanım
- Arduino veya Genuino Kurulu
- Analog Sensör (potansiyometre, fotosel, FSR, vb.)
Yazılım Gerekli
- İşleme veya
- Maks / MSP sürüm 5
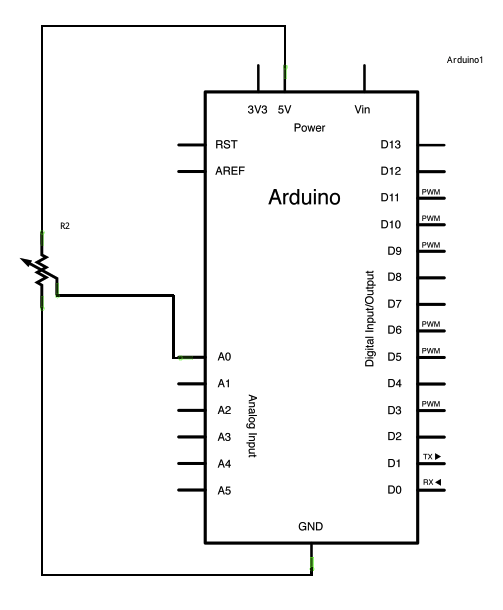
Devre
Analog giriş 0'a bir potansiyometre veya başka bir analog sensör bağlayın.
büyütmek için resme tıklayın

Şematik
büyütmek için resme tıklayın
Kod
/*
  Graph

  A simple example of communication from the Arduino board to the computer: The
  value of analog input 0 is sent out the serial port. We call this "serial"
  communication because the connection appears to both the Arduino and the
  computer as a serial port, even though it may actually use a USB cable. Bytes
  are sent one after another (serially) from the Arduino to the computer.

  You can use the Arduino Serial Monitor to view the sent data, or it can be
  read by Processing, PD, Max/MSP, or any other program capable of reading data
  from a serial port. The Processing code below graphs the data received so you
  can see the value of the analog input changing over time.

  The circuit:
  - any analog input sensor attached to analog in pin 0

  created 2006
  by David A. Mellis
  modified 9 Apr 2012
  by Tom Igoe and Scott Fitzgerald

  This example code is in the public domain.

  http://www.arduino.cc/en/Tutorial/Graph
*/

void setup() {
  // initialize the serial communication:
  Serial.begin(9600);
}

void loop() {
  // send the value of analog input 0:
  Serial.println(analogRead(A0));
  // wait a bit for the analog-to-digital converter to stabilize after the last
  // reading:
  delay(2);
}

/* Processing code for this example

  // Graphing sketch

  // This program takes ASCII-encoded strings from the serial port at 9600 baud
  // and graphs them. It expects values in the range 0 to 1023, followed by a
  // newline, or newline and carriage return

  // created 20 Apr 2005
  // updated 24 Nov 2015
  // by Tom Igoe
  // This example code is in the public domain.

  import processing.serial.*;

  Serial myPort;        // The serial port
  int xPos = 1;         // horizontal position of the graph
  float inByte = 0;

  void setup () {
    // set the window size:
    size(400, 300);

    // List all the available serial ports
    // if using Processing 2.1 or later, use Serial.printArray()
    println(Serial.list());

    // I know that the first port in the serial list on my Mac is always my
    // Arduino, so I open Serial.list()[0].
    // Open whatever port is the one you're using.
    myPort = new Serial(this, Serial.list()[0], 9600);

    // don't generate a serialEvent() unless you get a newline character:
    myPort.bufferUntil('\n');

    // set initial background:
    background(0);
  }

  void draw () {
    // draw the line:
    stroke(127, 34, 255);
    line(xPos, height, xPos, height - inByte);

    // at the edge of the screen, go back to the beginning:
    if (xPos >= width) {
      xPos = 0;
      background(0);
    } else {
      // increment the horizontal position:
      xPos++;
    }
  }

  void serialEvent (Serial myPort) {
    // get the ASCII string:
    String inString = myPort.readStringUntil('\n');

    if (inString != null) {
      // trim off any whitespace:
      inString = trim(inString);
      // convert to an int and map to the screen height:
      inByte = float(inString);
      println(inByte);
      inByte = map(inByte, 0, 1023, 0, height);
    }
  }

*/

/* Max/MSP v5 patch for this example

 ----------begin_max5_patcher----------
1591.3oc0YszbaaCD9r7uBL5RalQUAO3CvdyS5zVenWZxs5NcfHgjPCIfJIT
RTxj+6AOHkoTDooroUs0AQPR73a+1cwtK3WtZxzEpOwqlB9YveAlL4KWMYh6
Q1GLo99ISKXeJMmU451zTUQAWpmNy+NM+SZ2y+sR1l02JuU9t0hJvFlNcMPy
dOuBv.U5Rgb0LPpRpYBooM3529latArTUVvzZdFPtsXAuDrrTU.f.sBffXxL
vGE50lIHkUVJXq3fRtdaoDvjYfbgjujaFJSCzq4.tLaN.bi1tJefWpqbO0uz
1IjIABoluxrJ1guxh2JfPO2B5zRNyBCLDFcqbwNvuv9fHCb8bvevyyEU2JKT
YhkBSWPAfq2TZ6YhqmuMUo0feUn+rYpY4YtY+cFw3lUJdCMYAapZqzwUHX8S
crjAd+SIOU6UBAwIygy.Q1+HAA1KH6EveWOFQlitUK92ehfal9kFhUxJ3tWc
sgpxadigWExbt1o7Ps5dk3yttivyg20W0VcSmg1G90qtx92rAZbH4ez.ruy1
nhmaDPidE07J+5n2sg6E6oKXxUSmc20o6E3SPRDbrkXnPGUYE.i5nCNB9TxQ
jG.G0kCTZtH88f07Rt0ZMMWUw8VvbKVAaTk6GyoraPdZff7rQTejBN54lgyv
HE0Ft7AvIvvgvIwO23jBdUkYOuSvIFSiNcjFhiSsUBwsUCh1AgfNSBAeNDBZ
DIDqY.f8.YjfjV1HAn9XDTxyNFYatVTkKx3kcK9GraZpI5jv7GOx+Z37Xh82
LSKHIDmDXaESoXRngIZQDKVkpxUkMCyXCQhcCK1z.G457gi3TzMz4RFD515F
G3bIQQwcP3SOF0zlkGhiCBQ1kOHHFFlXaEBQIQnCwv9QF1LxPZ.A4jR5cyQs
vbvHMJsLll01We+rE2LazX6zYmCraRrsPFwKg1ANBZFY.IAihr8Ox.aH0oAL
hB8nQVw0FSJiZeunOykbT6t3r.NP8.iL+bnwNiXuVMNJH9H9YCm89CFXPBER
bz422p8.O4dg6kRxdyjDqRwMIHTbT3QFLskxJ8tbmQK4tm0XGeZWF7wKKtYY
aTAF.XPNFaaQBinQMJ4QLF0aNHF0JtYuHSxoUZfZY6.UU2ejJTb8lQw8Fo5k
Rv6e2PI+fOM71o2ecY1VgTYdCSxxUqLokuYq9jYJi6lxPgD2NIPePLB0mwbG
YA9Rgxdiu1k5xiLlSU6JVnx6wzg3sYHwTesB8Z5D7RiGZpXyvDNJY.DQX3.H
hvmcUN4bP1yCkhpTle2P37jtBsKrLWcMScEmltOPv22ZfAqQAdKr9HzATQwZ
q18PrUGt6Tst2XMCRUfGuhXs6ccn23YloomMqcTiC5iMGPsHsHRWhWFlaenV
XcqwgCQiGGJzptyS2ZMODBz6fGza0bzmXBj7+DA94bvpR01MffAlueO7HwcI
pWCwmzJdvi9ILgflLAFmyXB6O7ML0YbD26lenmcGxjVsZUN+A6pUK7AtTrPg
M+eRYG0qD9j4I7eEbco8Xh6WcO.or9XDC6UCiewbXHkh6xm5LiPEkzpJDRTu
mEB44Fgz4NCtJvX.SM1vo2SlTCZGAe7GZu6ahdRyzFOhYZ+mbVVSYptBw.K1
tboIkatIA7c1cTKD1u.honLYV04VkluHsXe0szv9pQCE9Ro3jaVB1o15pz2X
zYoBvO5KXCAe0LCYJybE8ZODf4fV8t9qW0zYxq.YJfTosj1bv0xc.SaC0+AV
9V9L.KKyV3SyTcRtmzi6rO.O16USvts4B5xe9EymDvebK0eMfW6+NIsNlE2m
eqRyJ0utRq13+RjmqYKN1e.4d61jjdsauXe3.2p6jgi9hsNIv97CoyJ01xzl
c3ZhUCtSHx3UZgjoEJYqNY+hYs5zZQVFW19L3JDYaTlMLqAAt1G2yXlnFg9a
53L1FJVcv.cOX0dh7mCVGCLce7GFcQwDdH5Ta3nyAS0pQbHxegr+tGIZORgM
RnMj5vGl1Fs16drnk7Tf1XOLgv1n0d2iEsCxR.eQsNOZ4FGF7whofgfI3kES
1kCeOX5L2rifbdu0A9ae2X.V33B1Z+.Bj1FrP5iFrCYCG5EUWSG.hhunHJd.
HJ5hhnng3h9HPj4lud02.1bxGw.
-----------end_max5_patcher-----------

*/
Çizim İşleme
Yukarıdaki kod örneğindeki İşleme çizimini kullanarak, sensörün değerinin bir grafiğini alırsınız. Analog sensörün değerini değiştirdikçe, aşağıdaki gibi bir grafik elde edersiniz:

Maks Kod
Maksimum yama buna benziyor. Düzeltme ekinin metni yukarıdaki kod örneğinde bulunmaktadır. Metni kopyalayın ve çizimi görmek için yeni bir Max penceresine yapıştırın.

See Also
- serial()
- analogRead()
- ASCIITable- Arduino'nun gelişmiş seri çıkış fonksiyonlarını gösterir.
- Dimmer- Bir LED'in parlaklığını değiştirmek için fareyi hareket ettirin.
- Midi- Seri olarak MIDI not mesajları gönderin.
- MultiSerialMega- Arduino ve Genuino Mega'da bulunan iki seri bağlantı noktasını kullanın.
- PhysicalPixel- İşleme veya Maks / MSP'den kartınıza veri göndererek bir LED'i açın ve kapatın.
- ReadASCIIString- Bir LED'in solması için virgülle ayrılmış bir tamsayı dizesi ayrıştırın.
- SerialCallResponse- Bir çağrı ve yanıt (el sıkışma) yöntemi kullanarak birden çok değişken gönderin.
- SerialCallResponseASCII- Bir çağrı ve yanıt (el sıkışma) yöntemi kullanarak birden çok değişken gönderin ve göndermeden önce değerleri ASCII kodlayın.
- SerialEvent- SerialEvent () kullanımını gösterir.
- VirtualColorMixer- Arduino'dan bilgisayarınıza birden çok değişken gönderin ve bunları İşleme veya Maks / MSP'de okuyun.