
Eğitimler
KeyboardAndMouseControl
Bu örnek, Fare ve Klavye kitaplıklarının birlikte kullanımını gösterir. Beş anlık anahtar, imleciniz için yön düğmeleri olarak işlev görür. Bir düğmeye basıldığında, ekranınızdaki imleç hareket eder ve yönle ilişkili harfe karşılık gelen bir tuşa basma bilgisayara gönderilir. Leonardo, Micro veya Due programlandıktan ve kablo bağlandıktan sonra, sonuçları görmek için favori metin düzenleyicinizi açın.
Not: Fare ve Klavye kitaplığı işlevlerini kullandığınızda, Arduino bilgisayarınızın imlecini devralır! Bu işlevle bir çizim çalıştırırken bilgisayarınızın kontrolünü kaybetmemenizi sağlamak için Mouse.move () öğesini çağırmadan önce bir kontrol cihazı ayarladığınızdan emin olun.
Gerekli Donanım
- Arduino Leonardo, Micro veya Arduino Due kartı
- 5 buton
- 5 10k ohm dirençler
- bağlantı telleri
- breadboard
Yazılım Gerekli
- Herhangi bir metin düzenleyici
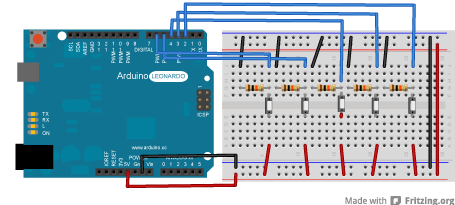
Devre
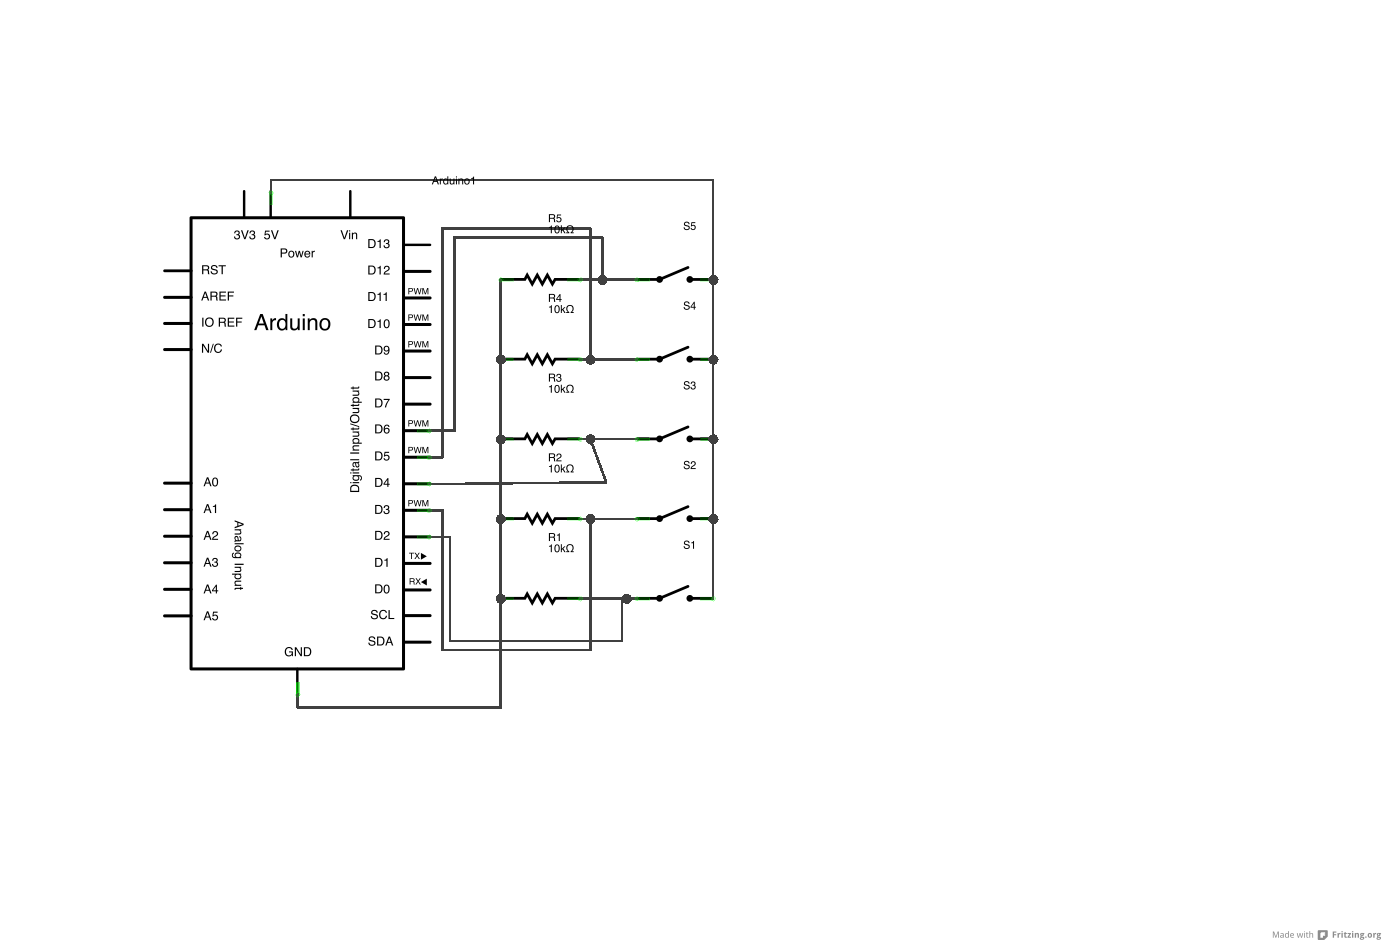
Butonların bir ucunu tahtadaki 2, 3, 4, 5 ve 6 pimlerine takın. Diğer ucu + 5V'ye takın. Dirençleri anahtarlar için toprağa referans sağlayarak aşağı çekerek kullanın. Onları tahtaya toprağa bağlayan pimden takın.
Kartınızı programladıktan sonra, USB kablosunu çıkarın ve bir metin düzenleyici açın. Kartınızı bilgisayarınıza bağlayın ve imleci hareket ettirirken belgeye yazmak için düğmelere basın.
Şematik
Kod
/*
  KeyboardAndMouseControl

  Controls the mouse from five pushbuttons on an Arduino Leonardo, Micro or Due.

  Hardware:
  - five pushbuttons attached to D2, D3, D4, D5, D6

  The mouse movement is always relative. This sketch reads four pushbuttons, and
  uses them to set the movement of the mouse.

  WARNING: When you use the Mouse.move() command, the Arduino takes over your
  mouse! Make sure you have control before you use the mouse commands.

  created 15 Mar 2012
  modified 27 Mar 2012
  by Tom Igoe

  This example code is in the public domain.

  http://www.arduino.cc/en/Tutorial/KeyboardAndMouseControl
*/

#include "Keyboard.h"
#include "Mouse.h"

// set pin numbers for the five buttons:
const int upButton = 2;
const int downButton = 3;
const int leftButton = 4;
const int rightButton = 5;
const int mouseButton = 6;

void setup() { // initialize the buttons' inputs:
  pinMode(upButton, INPUT);
  pinMode(downButton, INPUT);
  pinMode(leftButton, INPUT);
  pinMode(rightButton, INPUT);
  pinMode(mouseButton, INPUT);

  Serial.begin(9600);
  // initialize mouse control:
  Mouse.begin();
  Keyboard.begin();
}

void loop() {
  // use serial input to control the mouse:
  if (Serial.available() > 0) {
    char inChar = Serial.read();

    switch (inChar) {
      case 'u':
        // move mouse up
        Mouse.move(0, -40);
        break;
      case 'd':
        // move mouse down
        Mouse.move(0, 40);
        break;
      case 'l':
        // move mouse left
        Mouse.move(-40, 0);
        break;
      case 'r':
        // move mouse right
        Mouse.move(40, 0);
        break;
      case 'm':
        // perform mouse left click
        Mouse.click(MOUSE_LEFT);
        break;
    }
  }

  // use the pushbuttons to control the keyboard:
  if (digitalRead(upButton) == HIGH) {
    Keyboard.write('u');
  }
  if (digitalRead(downButton) == HIGH) {
    Keyboard.write('d');
  }
  if (digitalRead(leftButton) == HIGH) {
    Keyboard.write('l');
  }
  if (digitalRead(rightButton) == HIGH) {
    Keyboard.write('r');
  }
  if (digitalRead(mouseButton) == HIGH) {
    Keyboard.write('m');
  }

}
See Also
- Keyboard.write()
- Keyboard.print()
- Keyboard.println()
- KeyboardLogout- Geçerli kullanıcıyı tuş komutlarıyla kapatır.
- KeyboardMessage- Bir düğmeye basıldığında bir metin dizesi gönderir.
- KeyboardReprogram- Arduino IDE'de yeni bir pencere açar ve Leonardo'yu basit bir göz kırpma programı ile yeniden programlar.
- KeyboardSerial- Seri porttan bir bayt okur ve bir tuş vuruşu geri gönderir.
- ButtonMouseControl- 5 buton ile imleç hareketini kontrol edin.
- JoystickMouseControl- Bir düğmeye basıldığında bilgisayarın imleç hareketini bir Joystick ile kontrol eder.